Sunday, December 20, 2020

The Improved and Safer Pencil Sharpener

This is a revision of a little instrument I made a few years ago from a bonus spokeshave that had been

included in a Japan eBay purchase


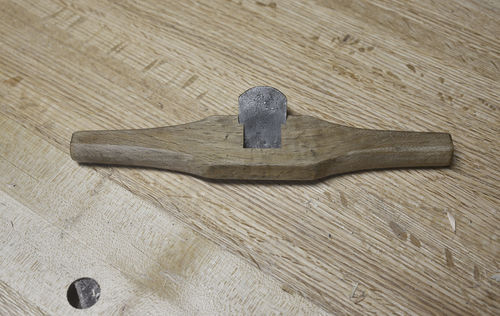
The blade was made into a pencil/lead sharpener.

It worked and remained in this configuration until I brushed up against the business tip of the blade

several weeks ago while cleaning up my benchtop. Only a superficial cut requiring a small band-aid but,

nonetheless a warning. When I had first shown it to DW, she thought it was cute, but did not want it in

the house, calling it an injury waiting to happen.

So the shop cleanup stopped and v.2 of the pencil sharpener began after first aid completed.

The first step after removing the protruding part below the blade  was a taper where the blade seats into

the block- easily done with a thin wood slice from a remnant piece of hardwood.

Matching the woods was not a priority. In the groove hopefully can be seen the cherry wood piece.

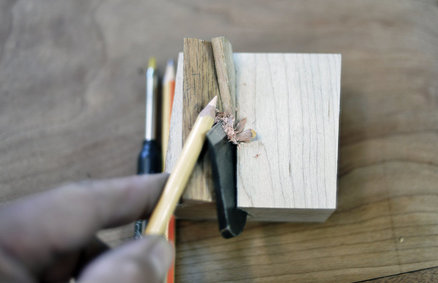
The next step was to make a cap that would cover to top of the blade waiting to slice, perhaps impale someone. This required a tapered groove to fit the shape of the blade. A western style plane blade would have made this fitting simpler, but 1) that’s the blade the design was built around and 2) I prefer Japanese blades. With the help of my miter jack jig the cap was made of three pieces glued together and then shaped to cover the tip while allowing the rest of the blade to do its work. 

Another photo with the blade cover on and a little dish for the shavings.

There are much simpler sharpening devices and much more automated ones. But a very useful aspect of the design is that it allows for differing angles as well as different points- standard, blunt vs sharp as well as chisel. It can serve for sharpening lead points as well (lead pointer).


Then there is the mechanical pencil option. I've been a geek about that instrument since I was able to write and have a bunch of them in varying lead thicknesses and quality; many passed on from my mom and DW. Right now, as I'm typing this, mechanical pencils are on my shit list. The black cloud over mechanical pencils is due to after having splurged on a putative marvel of design and craftsmanship, it arrives DOA- point won't advance and the retractable lead guard tip will not lock in place. After all that bally-hoo, the thing does not write. I'm not outing the brand as I've sent a complaint today and am waiting on how this is addressed.


It looks nice, though. What I got out of making and using my pencil sharpener versus buying this (at this time) lead holder led to a consideration of value which is a longstanding interest. One of the books I read this year, Having and Being Had, touched on many aspects of living in a capitalist society but did not dwell on them deeply. While I gave it a middling grade for that, the book was very much worthwhile as a thought/reflection activator on value. The pencil sharpener is valuable to me (an important qualifier) because of the IKEA effect (the increase in valuation of self-made products), scarcity (who else has one?), versatility (see above) and aesthetics (Wabi-Sabi). At the same time it has limited commercial prospects as the few who might be attracted to it, most can either make their version and those who can't would likely balk at the price at the Etsy level of production. If mass produced, then it turns into just another trinket likely to be discarded (see Veritas pencil sharpener).

Back to pencil sharpening. I suppose I ought to have better things to do with my time than doing things this way. But I like doing crafty stuff and this is the IKEA effect applied to the pencil sharpening act itself. But then, just as with anything done by humans, there's any number of folks who will make you look reasonable and moderate. This guy provides a frame of reference as to what can happen: $38.00 in paperback.


"...I am so thrilled David Rees is picking up the reins of the forgotten art of manual graphite-encased-in-wood point-crafting. I love my pencil!"
—AMY SEDARIS

Sewing Machine Makeover

 As covered in an earlier post, it was important that my Mom’s sewing machines stay in the family. One reason is sentimental, the other is that DW was a prolific sewing enthusiast in her younger days. Work and other adult stuff led to that activity hibernating, but with her planning to take that up again when she had more time. So the machines sat in our spare room for a couple of years.


With the pandemic and retirement, her interest in sewing  resurfaced. Also, while the spare room saw no use this year due to lack of out of town visitors, now it was being used more often after becoming the holding library for DW’s children’s book collection. With that, there was less room for the machines. The only wall left was the one from where the photo was taken.


The easiest solution would be to saw off the overhang where the side drawer mounts. Would provide another foot which would allow for the machines to be side by side and for the closet door to open fully.

Machine to be where cat and daybed are
Machines to be where cat and daybed are
While that would be easy to do with a track saw in situ, it would generate a lot of dust and an ugly end result. That meant dismounting the machines then removing the tops. The part I was least looking forward to was the first.

Underside of the Fomax

The main challenge of the Fomax disassembly was the position and weight of the motor. The overlock machine in one aspect was easier as the machine and motor were not attached to the top but to a supporting platform that hung from the top with bolts. Below shows the scaffolding for that platform was done to allow for removal of the top. It also shows quite a bit of sagging- one of the many reasons I despise particle board.

The machines are built like tanks given that they were meant for professional use. The tabletops though, were made of particle board and formica veneer and left much to be desired. Again, easy solution to the placement problem is to chop off the side where the drawer goes in the shop, remove the edge veneer on the othe sides, replace with new edging and reinstall- but that would not solve having to live with particle board and formica. So between DW’s renewed interest in sewing and my non-work activity options limited thanks to the pandemic, it was a good time for making new tops.

The cutouts for the machines were straight forward given that I was making the replacements from planks as opposed to plywood panels.

The old tops served as templates for drilling mounting holes for the machine and for the tops.


One source of concern had been the difference in table thickness as the hardwood was 1/4th inch thicker than the original top which might have made a difference in the motor belt tension. Thankfully the motor provided a mechanism to compensate for that. Another little wrinkle that was easier to solve with the machines partially disassembled was providing leather pads for the metal feet. The last problem was addressing both the sag and the appearance of the overlock machine platform- Replacing it with a plywood one would have been more work than it was worth. The rabetted hardwood piece in front both hides the end "grain" and with glue and screws corrected the sag.

Here are the machines with the new tops. The change from 48 to 41 inches long for the tops allows them to be along a shorter wall. 

The room looks much more lived in now. Have to think Mom would be pleased with the new tops.