Wednesday, May 31, 2017

Black Hole Box


This small tools box is only 220 cubic inches.
But it contains a good part of two weekends worth of leisure time, along with packing a number or firsts: my first wood dowel hinge, a DIY dowel centering jig, miter spline in a dovetail pattern, use of a western dovetail saw (needed a wider kerf), glue+shavings for patches, and skill developed with dovetails and use of cyanoacrylate glues. Much experience was gained in the making of the little box, or- as Oscar Wilde put it- what old people call their mistakes. Thus the density metaphor.

The project started with a need for organizing some spare parts and small tools that were often needed but because of their size were often misplaced and then took way too long to remember where I last put them. The default storage was a little packaging box for some Lee Valley doohickies.
It was too big for the small items and too small to work as a hold the small essentials tool box.

Thus it began as a open box to hold a number of essentials in dedicated compartments and for practice making dovetails. When the dovetails turned out better than expected, my ambitions for the little box grew. I'm anticipating needing to travel with some of my tools in the coming months. If the box is going to work for taking essentials back and forth, a latching lid would be needed. Looking for hinges for an inset lid for a box with  3/8" thick sides and lid was an unexpected challenge given my inexperience with this scale of construction and not wanting to spend an hour traveling to and shopping at the nearest Rockwell and Woodcrafters. Internet searches led to Rob Cosman's wood hinges.
Image result for rob cosman wood hinge
As presented on YouTube, it was a very elegant solution, but with two initial obstacles before getting to the "devil is in the details" aspect of achieving the hinge itself. He stresses that a major requirement is the ability to drill a hole in the center of the dowel for  pins to link the hinges. Entrepreneur that he is, Cosman then notes that he offers metal jigs built for that purpose. After some daydreaming about an alternate solution, a more readily available jig could be done with the right sized drill bit and forstner  bit. My solution was $7 for the forstner bit vs $53 for his jig with shipping.
The other tool requirement was a core box router bit that BAM carbide- a blade and router bit supply and sharpening store 3 miles away from home had in store.
Now comes the hard part. Due to the tails being in the way, I needed to route out the groove in two different orientations which made for a suboptimal groove for the dowel hinge. Further, using CA glue for this application was a bad choice. To end, the joint failed which put me in a funk. DW noted- hobbies are supposed to be fun, right? But the silver lining to this black cloud was using a paduak replacement for the segment of the top removed to make a new groove. Making a new back portion using a pins first approach was another first. While the pin orientation remained an issue, the second try was a success using good ol' yellow glue. However, I was limited by geometry in how deep I could make the groove. Cosman notes that you need to cover close to 2/3rds of the dowel to avoid exposing the embedded pin.
In order to embed the dowel to the optimal depth the rear side needed to run through on its top edge, but as the pins were higher than that edge and were not symmetric, it was necessary to run the piece on it's side which allowed for only a quarter of the dowel to receive glue contact. I then got greedy and in planing the hinge flush partially exposed the pins at one edge.
Thus, it's a weak hinge. In future projects until I develop a reproducible and reliable approach to this technique, it will be best to make the hinge first and then build around it. It's an attractive and effective joint if properly executed and will be worth the effort in developing competency. I might even get Cosman's jig.
The jointmaker table saw has made small size projects safe and enjoyable.
While the compartment piece miter cuts off the JMTS  could have been glued together effectively, using my miter jack jig made them dead square. I'm in the habit of splining my miter joints when doing picture frames and good ol' Cosman has another fun technique- false dovetails, which are basically angled splines. Simple enough, but my handsaws of choice (Japanese) have too thin a kerf to make a structurally significant spline. So, I purchased a western saw (another first). This joint shows the difference in kerfs.
I didn't ruin anything, but cutting by pushing instead of pulling took some getting used to.
The last part was organizing stuff so it was readily accessible, yet would not get banged around or move out of place. The BCTW Kerfmaster made the dado cuts easy.
There is a triangular ruler that is used frequently enough to merit a place but due to lack of foresight was a bit too long. Here is the solution.
I was going to drill a hole in the front of the box as a hatch, but DW suggested looking for latches online and I found one suitable for the thickness of the sides and top. I then got ambitious and decided to try and inset the parts with resulting splintering and irritation. The CA glue mixed with fine sawdust along with a small sliver glued with CA saved the day.
Here are views of the finished little box.


DW requested an earing storage box for her Bday. That will be late in the summer. Also in the future is a hand tool chest that will have a compartment for this box. Fun, fun, fun!


Friday, May 19, 2017

Sofa Armor

Our living room sofa is one of the few remaining vestiges from my bachelor days. It's 25 years old and  for the past 18 years has served as the anchor furniture item of our living room and principal scratch post for our three cats. It's associated with lots of memories and that's likely the reason why DW is as attached to it as I am. It's one of the remaining reminders of the two cats we lots last year
But it's an eye sore in several locations.

Some can be hidden from view with appropriate placement. Locating the sofa against the wall and flanked by side cabinets keeps Girlfriends work obscured while preventing Andy from cauing further damage. Andy, however, took to the arms with a vengeance and we have not been able to modify that behavior.

We were exploring re-upholstering the sofa, but couldn't decide on the covering in the likely case of not being able to find a closely matching material. Then there was the also likely case that Andy would eviscerate the poor sofa again.
An alternative approach developed while researching miter jacks (see previous post).
couch table
Our couch's arms with it's curves and angles, along with the location of the area needing shielding presented a number of challenges in adapting that idea to our problem.
Which brings back a previously used quote
Make sure that your next project is beyond your skill and requires tools you don't have. You won't regret it.
I had used kerfing but with drywall and a long time ago. I wasted 2 sq feet of walnut and an afternoon of time before admitting the need for instruction- the problem was that the kerfs needed to be perpendicular to the grain for optimal flexibility. In retrospect, this would seem be obvious, but being a master of the obvious sometimes eludes me. Kerfing with hardwoods and at a fairly tight radius left me fairly humbled (not anything new) and required the band at the upper aspect of the curved panel to hide the gaps between the top and the side panel as well as the areas where the thin obvious patching on my first attempt at curved panels.

The thin band used for this required thin kerfs , something that the BCTW Jointmaker greatly facilitated.
Much to my chagrin while sanding and finishing three small faults developed when the area under the kerf was too thin to hold up to the pressure applied when sanding and finishing.
That was my clue that I needed to leave the stress lines on the curved panel surfaces alone.
A valuable aspect of hobby activities is that it allows risk taking and to indulge my bent for impatience and "winging it". While the result is serviceable, to my liking and has DW's approval, there's much room for improvement. The next attempt at this sort of thing will be closer to 1/8th rather than 1/16th along with using a hot soaked towel to help with molding. I've also read that using a mold pattern to allow for the panel to dry in the desired shape also helps a lot.
In the tools I don't have dept, a spokeshave (along with investing time to learn to use) and a good quality coping saw will be necessary investments if I'm going to significantly improve with curved pieces. A spokeshave would have come in handy when trimming the curved portion of the top to match the curved panel. That was the one place where I could not use the loose tenons to guide placement.

Here's the couch armor in place from the side
And the front view


Saturday, April 22, 2017

La Forge Populaire Miter Jack


I first came across the La Forge Royale miter box when looking through the Benchcrafted  blog in preparation for building my workbench. It was an elegant device that was filed away in my mental future project list.
Image result for miter jack
My interest in this appliance resurfaced when researching ways to make small picture frames without holding small hardwood pieces with one hand  between the sliding saw fence and  the sawblade set at 45 degrees. A miter box was one solution. A Stanley 150  model in good shape and a fair price was bought on eBay and could be used with a Japanese saw ( I stayed away from boxes using Western saws).
After modifying to accept a Japanese saw, it worked but required trimming to achieve a precise 45 degree edge. I sent the box off to my machinist cousin who would work on it between his larger orders. It's been 2 months since I sent it, but given his kind offer to do it for fun, I have not bugged him about it; maybe I'll call him this weekend.
It also seemed when reading about their use that most miter boxes produced results that require additional trimming. A dedicated miter trimmer was an offered solution in these articles but seemed  too limited in use to make sense in my shop. In the mean while a Jointmaker SW came up on eBay and for once the bidding on it was not out of control. While with depths less than one inch, it was dead square, when working with thicker pieces there was a slight drift. This got me to thinking about a miter jack again.
They tell me if you can see the line you can cut to the line. That doesn't apply in my case at least when I comes to chiseling across lines interrupted by pins and tails. It became an OCD objective when it became clear that as a dovetail novice, I could use help with that task. Given that deficiency, I would have more use for the 90 degree surface than for the 45 degree face.
An  initial obstacle was the wood screw mechanism. At the time I was preparing to start building the jack, Benchcrafted sold the metal parts for connecting the screw to the movable part of the vise.
Image result for miter jack vise
I was on my own, however, with regards to the wood screw and nut.

I had no interest in learning to make wood screws and nuts or acquiring the hardware needed to make these. Metal screws were used in other DIY variations but these seemed to have either a limited travel range or appear excessively large for the task.

Then I had an Eureka moment where it dawned on me that the solution was quite possibly on my benchtop already- a Veritas quick-release wonder dog.

I began the build 2 weekends ago. DW wanted something to cover a clawed up sofa, but as mentioned above, the miter jack had become an "obscure object of compulsion" to paraphrase the title of an old Spanish movie. I used the Benchcrafted directions for the most part except for a few changes; hence the "populaire" name change.
Instead of  2 inch thick quartersawn maple I glued together 4/4 planks with the rings in alternating direction. Resulted in a little thicker base. I also had the base extend past the fixed jaw for an additional clamping area when held perpendicular.
Instead of a solid block to form the vise jaws with the angle cut with a band saw, I serially ran 8/4 boards through my table saw at a 45 degree blade tilt, then used dominos to maintain position while gluing.
Much to my dismay, the last 45 degree cut exposed the dominos.

Which is why the purpleheart rectangles are on the upper part of the jaws along with the medial aspect of the jaws featuring  a purpleheart insert running along the middle.
The most difficult part of the project was achieving  true 45 and 90 degree faces on the jaws. I needed four tries to achieve the final result. Even with use of the table saw for the 45 degree cut, there was a lot of  maple end grain hand planing. Painful but necessary as that reference surface is (to keep the French thing going) the raison d'etre for the Jack.
Any possible use for the 22.5 degree insert the Royale featured was not worth the extra effort on my part to make it. If it does turn out to be sufficiently useful, I can add it later on. Thanks to the pattern maker vise and Veritas surface clamps, I can hold the Populaire in a 90 or 45 degree orientation without resorting to making the accessory base
Image result for miter jack
As it turns out, Lake Erie is making a run of the wooden screws and nuts used in the Benchcrafted build. The Royale is prettier and more free-standing than my Populaire, but its $200 saved and I didn't have to wait for the anticipated June delivery. The quick release dog is easy enough to remove and replace if needed
Here is in standard position secured by bench dogs:
At a 45 degree angle:
And perpendicular held by surface clamps:
The next project is something along these lines to cover up and futher protect our poor couch against Andy's claws.
couch table
The above is courtesy of She Works Wood- the author is way up on the food chain both as blogger and wood worker.

Friday, April 14, 2017

Dovetails and Miters

In my sawdust producing evolution, two areas stood out as needing improvement. While eventually I could arrive at a satisfactory product, being able to reliably and consistently make frames with tight miters that required no further tweaking was an unmet goal. This is despite probably having made at least 60 frames over the years. Specifically, it would be difficult for me to produce 4 identical frames with precise miter joints. This was goal 1.
The other goal, much more ambitious and unlikely to be met for 2017, was to make precise dovetails. An obvious way to get there is by using router jigs. That route was unappealing as it would have that element of rote and uniformity that marks mass produced works even though that result in a perfect fit between the pins and tails.
With those objectives in mind, a frankenvise, a Jointmaker Single Wing purchase, a picture frame, a stand for said Jointmaker and a rookie dovetail project follows.
Frankenvise
Other than the condor tails I made for my workbench, I was a complete dovetail newbie.
Reading up on dovetails, it seemed a Moxon vise would be a handy bench accessory. While in researching workbench vises, I had decided on a pattern makers vise, but also figured a wooden screw vise should be part of my arsenal. The Lake Erie version combined with my vise had the potential of being capable of holding large items in my mind's eye as well as serving as a Moxon vise. At that time LE Toolworks had a sale, so around Thanksgiving I ordered the screw and an extended wood vise nut. Lee Valley during that time also was offering free shipping so their 3/4" bench anchors would be a great way to secure the proposed frankenvise to the bench.

Once it proved to be a viable device, it seemed too useful a jig to only be used on the frankenbench.
Once seeing that bench anchors were also available for 20mm diameter holes, remembering designs which used pipe clamps for Moxon/dovetail vises led to two easy alterations which allowed the appliance to be used on my countertop area

and also on a MFT top.

In it's pipe clamp configuration it can also be used as a double vise at the end of the frankenbench.

Thus far, it's mostly used in combination with the pattern makers vise. This combination allows for a bench height tolerable for the hand plane work encountered while working on dovetails while being able to saw and chisel at working distances easy on old eyes and back.
Jointmaker Single Wing
While unwilling to go the router based dovetail jig route, I'm not averse to getting mechanized help where I can find it. Enter Bridge City Tools. I visited their showroom last fall and quickly became a fan after using the company's Japanese saws (by dumb luck he had an adjustable back saw in stock that was perfect for cutting the condor tails on my workbench. John Economaki  gave me a brief primer on dovetails in general along with assigning an afternoon of practice. Hate to admit, I did not complete the latter assignment. Went ahead with condor tails after two practice runs with predictably rookie but acceptable results. While there, though, I also had a look at his Jointmaker Pro table saw- a neat machine but 1) unaffordable and 2) not in stock. But as I had caught the BCT bug I kept looking at eBay for more Japanese hand saws. While I could only buy one more hand saw- one of my favorite tools, has an incredibly thin kerf and high tooth count, I was able to hunt down a single wing Jointmaker. Fortunately as well, it was one BCT item that actually sold for 70% of the original price and nearly 1/2 off the JMP model- it's not uncommon for BCT to sell for a significantly and at times ridiculously higher amount than the original price. I received it in new in box, unassembled and in original packaging condition. When I commented on this to BCT staff they noted that this version had not sold well. I replied that, for one thing, it would be difficult for a right handed person to use smoothly, but works like a charm for a leftie. His manager noted that John E is left handed.
Anyway, once assembled, I used it to replace a poster frame that had been one of my first efforts. Here are the miters from that frame
It was a case of beginner's luck as the replacement frame using the Jointmaker required no further tweaking of the miters.

However, attempts at deeper cuts revealed a tendency of the blade to deviate from perpendicular for cuts higher than 1 inch. I  tried multiple adjustments, including making a dedicated stand for the table before putting up the white flag and calling John E for help. He noted that my problem most of the time was due to the work piece  not being properly secure. The fences supplied with the table/miter saw are not really designed for securing tall or thick workpieces. BCT's literature cheerfully notes that most users will make fences specific to their needs. Here is my design.

In the mean while, I was happy to find that BCT was going to produce the table and a much more precise and elegant (with a price to match) fence. Like all BCT products- good things come to those who wait, so in the meawhile, I'll make do with my DIY fence.
Jointmaker Stand.
A stand was also on eBay but I passed as it seemed kinda flimsy and expensive.  Once I had some experience using the machine the desirability of having a dedicated base became clear. It would help in minimizing any blade deviation due to saw movement. Also, optimal use was on a base lower than normal workbench height. While I could lower my workbench to an ergonomic height for the Jointmaker, that made the workbench too low for other dovetail making tasks. I resisted making a dedicated base given my tendency towards sparseness, but it's a small footprint, easy to move and doesn't interfere with any other tasks.

I'm hoping also that a new thicker blade that is in production will also help with the drift problem. To keep things in perspective it's only a slight deviation, but because it's slight, cleaning up the miters along with making less than 1/16" changes in length, made me realize the usefulness of a shooting board.
Which leads to the next project- a variation on a Benchcrafted project, the La Forge Miter Jack ... but that's another story.
C. Schwarz prescribed a dovetail a day to become a better dovetailer. I started that assignment after assembling the Jointmaker. Then realized that I had better sharpen my chisels as I was crushing instead of slicing. So there was a "lost weekend" spent on chisels and plane blades, which is what happens when more than a year had transpired since the last time that chore was done.  While initially intended solely for practice, part of the process was to mark them as carefully as possible to achieve sequential part alignment and as an attempt at making a box. Also, practice in context of a project works better for me.  I did chop off the first two attempts and started over. It was a pleasure to find that dovetails resulted in  three sides matching up and being square. This allowed for the fourth side to be cut with tails on on both ends fit on top with the whole thing square. While not exactly heirloom grade, I was pretty happy with the result. At the top of the list in readily identifiable areas for improvement are better marking lines and paring to the line with chisels. But focusing on the positive, DW thought I should turn it into a keepsake piece. Which brings us to Ernie's urn.
The 2016 Holiday season was a somber time for us as we had lost our 12 year old cat in the summer and out 18 year old cat in December. Ernie had been with us since DW's sister gave him to us as a kitten shortly before our wedding. He was and still is a part of our lives. Ernie's ashes returned in a nice little urn but he deserved more. It had been my intention that my first dovetail project be his urn and  that it features my first viable dovetails adds to it's value.

To anyone else, it's an OK box, for us it's a labor of love. The top is a photo of a blackboard chalk drawing DW did many years ago of Ernie. It was printed directly on a sheet of maple veneer and glued to the top cover . We'll keep the urn in our music/library room as that was his favorite spot.

Thursday, March 9, 2017

A Tale of Two Benches, Part 2: workbench

We've been through
Some things together
With trunks of memories
Still to come
We found things to do
In stormy weather
Long may you run.

N. Young

Just like 'ol Neil and his beat up hearse, I was attached to my original workbench. Made in my scuffling days fresh out of residency, new to Oregon and fixing an old ranch house, it was my first furniture piece (like most woodworkers). The top was an discarded exterior door with left over number two oak flooring stapled and glued as the working surface. The base was glued together 2x4's. The joinery was wood screws and dowels (hope you don't spit up whatever you're drinking while reading this). And the vise was left behind by the previous owner.


Thing is though, while the base was pretty wobbly especially lengthwise, the top was (and still is) true, stable and capable of withstanding everything I threw at it and on it. Just as Orwell noted that at 50, everyone has the face they deserve, my benchtop developed a greatly prized patina.
Knowing how fond I was of my bench, when I first began ideating about a better workbench, DW wondered if I'd be able to part with 'ol faithful. Once finished with the major part of the shop rehab and DW happy with the new couch/sofa (bench 1) the plan was to make a new base and use the existing top. While picking up wood for the base at Crosscut Hardwoods, I came across a red oak glu-lam 11"W x 3" thick and 8ft long. The price tag on it was $90. After confirming that was indeed the price ( a large project's version of scrap wood was the reason for the price), that I could lift it and that it could fit in my Saab, I was on my way home with the materials for the base and with 1/3rd of a new benchtop. It's important to recognize kismet when it's happening.
As well as my old bench had served me, it had felt too wide and it needed a better vise. Twenty years of using my bench identified definite needs and wants and the glulam had only served as a firm nudge in acknowledging  that the old top was not going to satisfy the major ones.  As a college graduate in general, I read up on the topic- on-line stuff and, as an old college graduate, bought some books on the subject.
Best Workshops, Ed. Fine Woodworking had been purchased while rehabbing the shop. It had a couple of chapters which were useful once I decided to go the new workbench route. The Workbench, L. Schleining presented an overview of a wide variety of benches and accessories- more food for thought. The Workbench Design Book turned me into a Chris Schwarz fan. He is opinionated, a bit of a Luddite and prone to idiosyncrasy. I didn't follow all of his advice because I'm kinda the same way but his 18 principles for building workbenches were a great way of organizing the project and explaining my choices.
Principle No.1: Always overbuild your workbench.
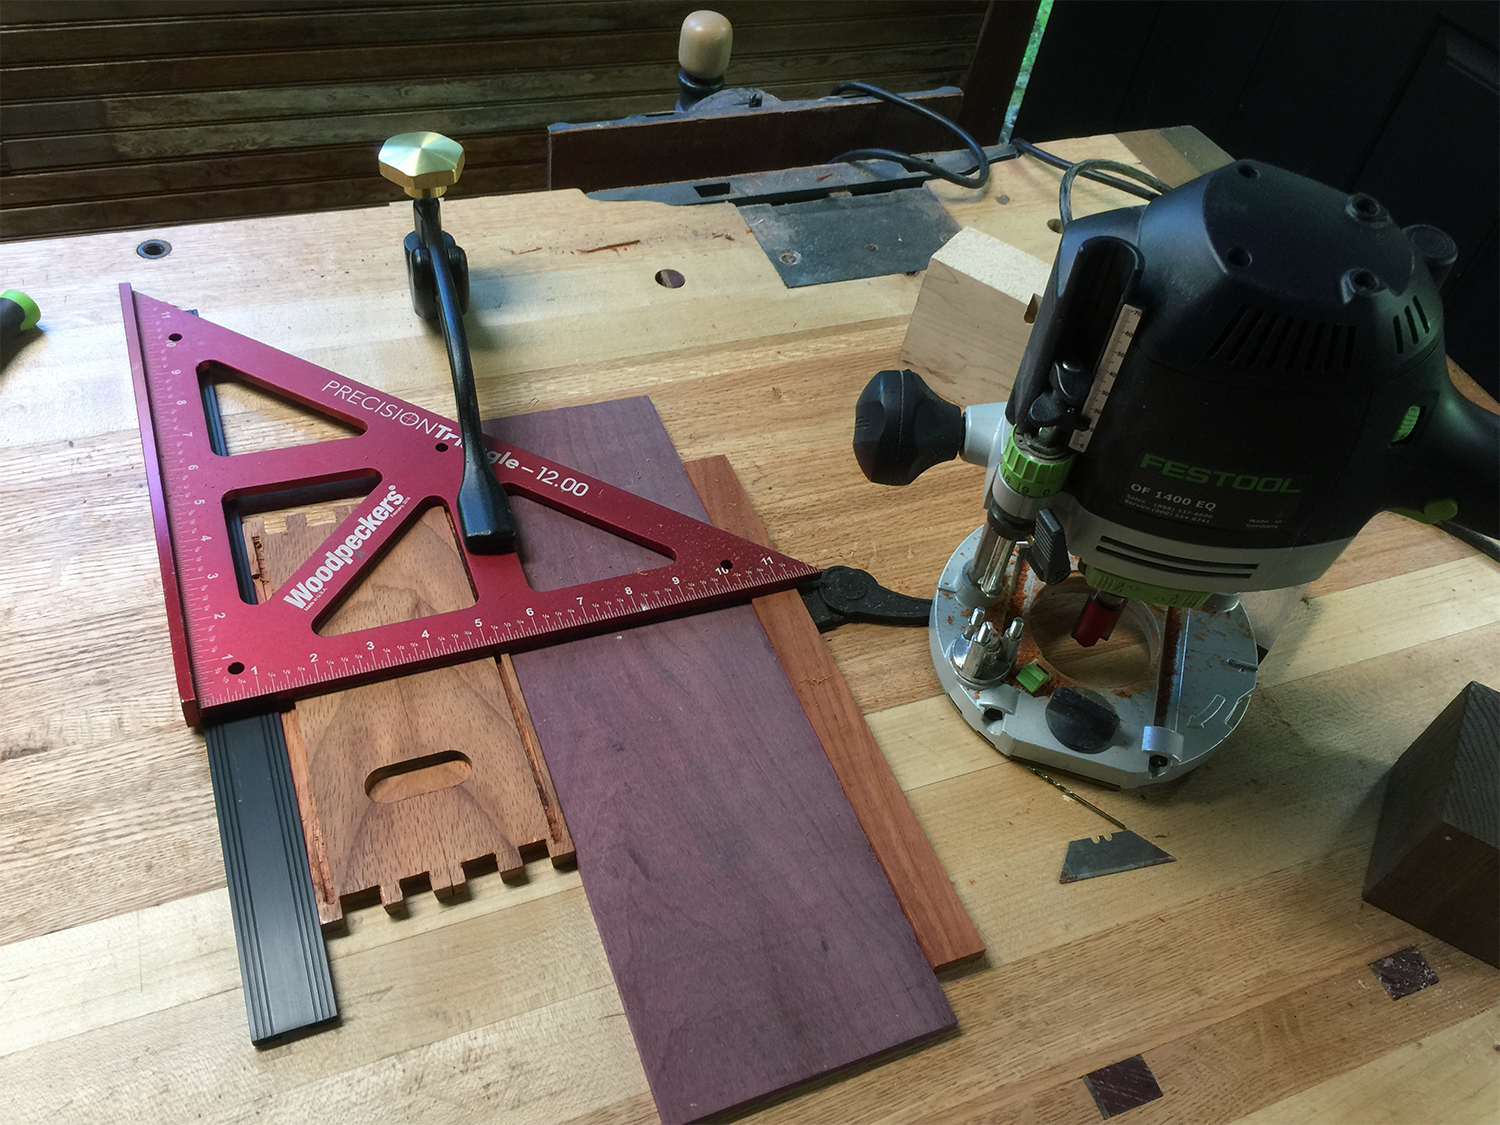
While a 2.5" thick top worked well enough up to now, I knew there was room for improvement. This was especially the case when carving out mortises. Thus, even though the gluelam weighed about 100 lbs, the other sections of the top were going to be 4" thick. This would make for more effective chisel work as well as provide the thickness needed for optimal vise installation. Schwarz also notes there is no such thing as too heavy until you need to move it. Which is why it was useful to build the top in thirds. Woodcrafters in Salem was nice enough to joint the 8/4 maple and oak boards (not enough maple on stock in the lengths and widths needed). My modified MFT's were very helpful in providing infeed and outfeed support. Where as my old Jet TS may not have been up to the task, the SawStop had no trouble.

Principle No. 2: Always overbuild your workbench. (remember Fight Club?)
My wobbly, poorly joined base was the worst flaw of the old bench.
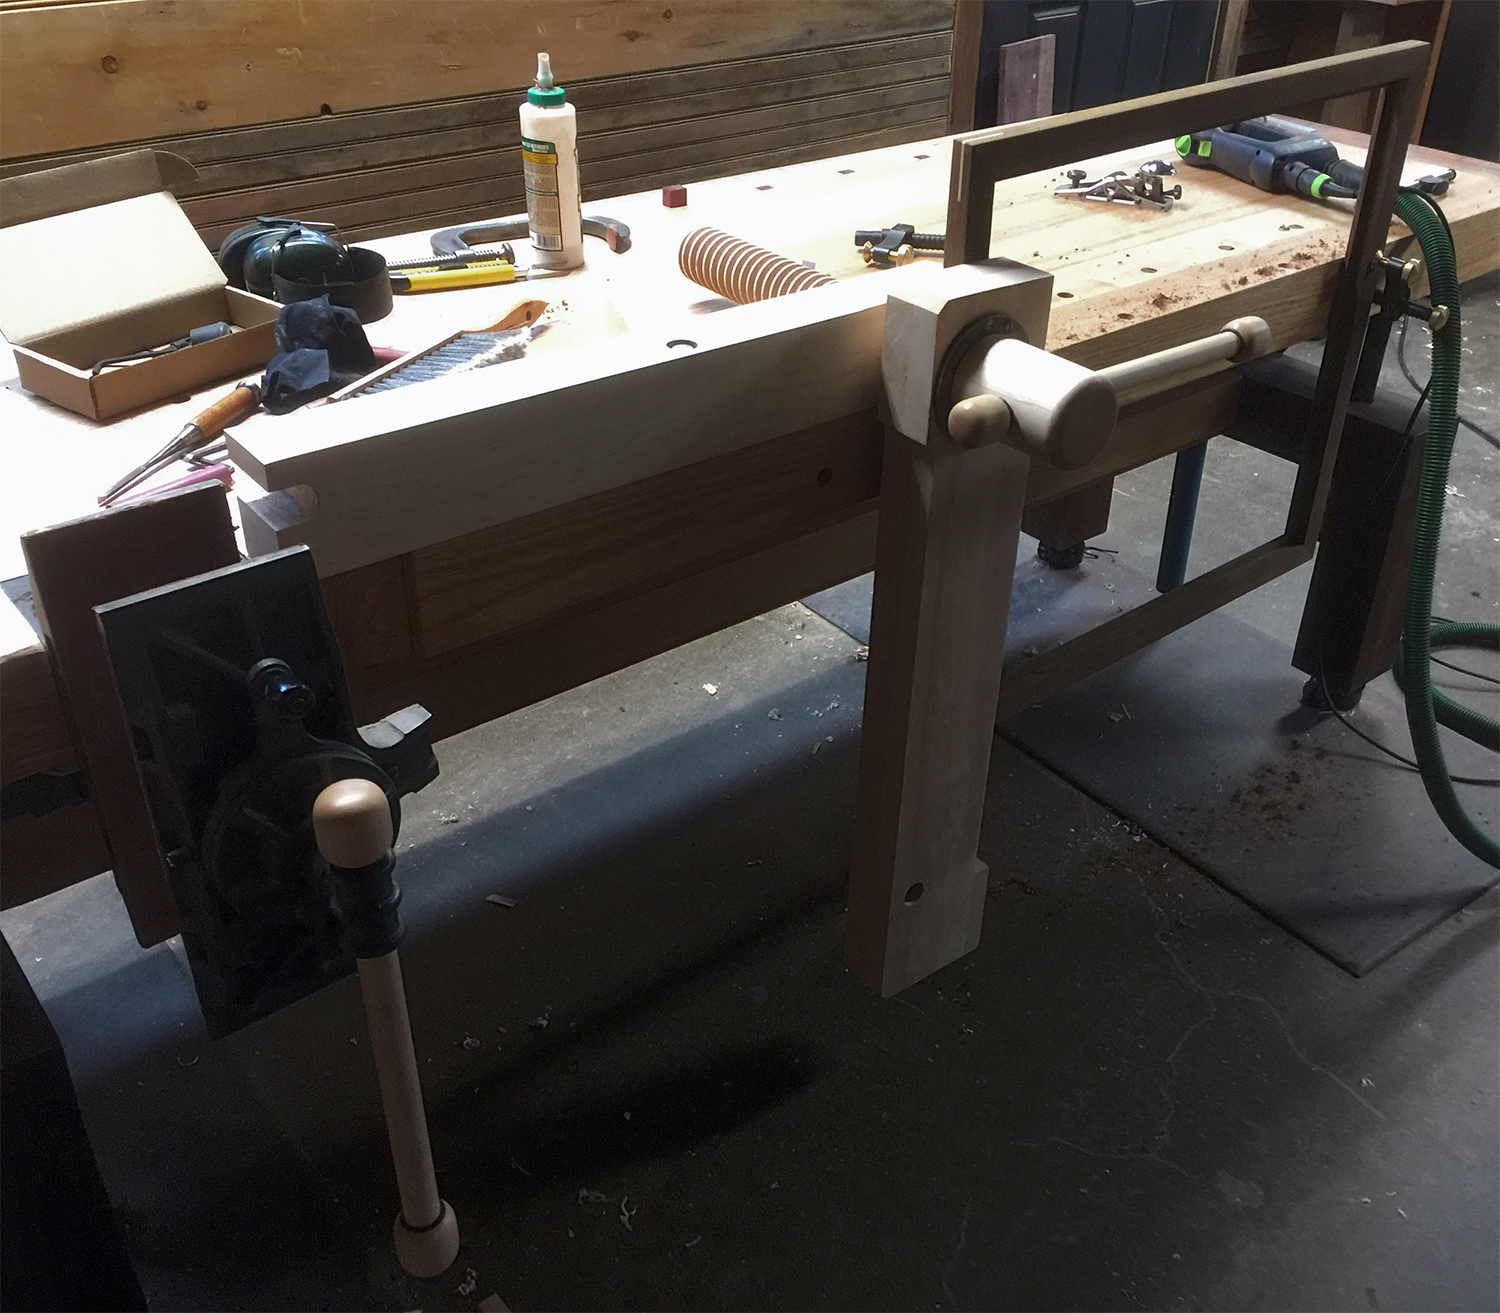
The base this time would use 5" thick uprights joined by open M&T. The spreaders were connected by Bencrafted barrel nuts and bolts. These were thicker and wider than otherwise needed. This was to compensate for the front spreaders' more posterior placement to allow for open space anteriorly. The height adjustable section may appear less stable than a Roubo M&T, but the screw jack is rated at 2.5 tons and the 1 inch pipes providing lateral support are fastened by spax screws.
Principle No.3: Question unusual designs
This is where CS and I part ways. He proposes that unusual designs lead to benches that fail to do their primary purpose optimally- hold wood tight so you can shape it with force and precision. I'm at the age where it's uncertain how many woodworking years are left. So I want the bench to be useful in some capacity after I'm done with it. The height is adjustable from 30" which is a good desk or table height to 45" inches (as shown above). At that height it requires additional support to be rock solid length wise. Most of the time, it's used at the 32 to 38 inch height; at that range, it works the way it's supposed to and lets me choose a position that's easy on my back. The other design feature is open space under the front of the bench. At this time, I prefer to stand when I work in the shop, but I wanted to have option of using a chair or stool.

Why not have different height tables, in the "horses for courses" approach CS advocates? Downsizing is in the future for us and my future shop space is likely to be the area most impacted. The variable height will be even more useful in a small space as will be the open space in the front which can serve to accommodate storage.
Principle No.4: Your bench cannot be too heavy or too long. But its top can easily be too wide or too tall.
I experience the too wide problem with my first bench as its footprint was an exterior door; 36" made for awkward access to the opposing side. I had intended mine to be 27-28 inches wide. It ended up 29 inches wide when I decided to make the back face of the patternmakers vise flush to the front edge.

Trust me, it's easier to do this after the vice has been installed than to modify the template provided to make the cavity needed.
Principle No. 5: Choose the right height-lower is better.
As CS duly notes, workbench height is deeply related to the task and the tools. And that if "you are going to be a crazy American generalist then picking the right height is a futile exercise". He then further dismissively notes that adjustable height benches are usually mounted on casters. Guilty as charged. I'm a generalist by inclination and background (I grew up in So. Central L.A. and Walter Mosely noted that folks of modest means don't have the option of being specialists). I need to make all kinds of stuff and I like to use all kinds of tools- power, Western and Japanese- thus a bench that allows that. His mentions of the Moxon vise allowing for a higher working surface led to looking into a way of integrating that idea into my bench design. But that's the subject of the next post.
Principle No. 6: Where your bench should live in the shop.
I very much share CS's regard for window light and installed as many windows as code allowed in my shop. Unfortunately, I still need overhead fixtures on to have adequate lighting, but having a component of illumination coming from window light is psychologically important.
Principle No. 7: You should be able to move your bench, but not too easily.
CS's solution are hinged casters, which he admits are ugly and depend on being able to lift 400 lbs off the ground and flip in or out with your feet- no thanks. The Footmaster casters installed allow for a locking position that is unbudge-able on the rubble mats the bench stands on and also have the benefit of leveling an uneven floor.
Principle No. 8: Your bench is a 3-D clamping surface. Anything that interferes with that will frustrate you.
At one point I was considering storage below the benchtop. DW advised against it on aesthetic grounds. CS noted that "the job of the workbench is not to store tools". Agreed. But, there was a area between the two spreaders which lent itself to storing tracks and other long and unwieldy items. Turning that into storage was useful and did not compromise aesthetics or primary function.
Principle No: 9: All benches should be able to grip the wood so you can easily work on the faces, the ends and the edges.
Here, CS gives several work holding chores as a litmus test for a benches' utility. In the interest of brevity my bench could handle all those tasks, although some were much more easily accomplished with an Moxon accessory attached.
Principle No. 10: Aprons or skirts are good to look at.
Guilty of this on my first bench as it hid the particle board/oak flooring used. I did build up the edges with 2x4's to provide adequate depth for the dog holes and to allow for using the edges for clamping. N/A for new bench.
Principle No. 11: An overhanging front edge.Do you want it?
As before stated the front 12" are free and clear except for the pattern vise mechanism. So if needed I could use a bench slave. The other face has the stretcher on the same plane even though there's no use for a deadman board. My 91 year old mom would like CS, however (makes sense if you have the book).
Principle No. 12: The tool tray.
I agree with CS-to be avoided as it would collect junk and go against P. #8.
Principle No. 13: Select the best material.
I used hardwoods for the top; as can be seen by my old benchtop, I need stuff that can take a licking and keep on ticking. CS is right about a hardwood top being expensive and tough to flatten. As the top was too heavy to be able to take to the local shop with a drum sander. Thus my excuse for a No. 7 jointer plane. Love that tool, in a sick pup, but not perverse, sorta way.

Principle No. 14: Showcase benches made from exotic materials with showy details are nice.
The base could be made from a softer species, but with mass rather than density, to make it stable. Thus the thermally treated poplar. I like the stuff for bases as it's dimensionally stable and working with sorta brown/yellow wood gets old. My attempt at showy details was limited to condor tails- my first go at dovetails. Grasshopper has much to learn, but as joinery to secure the end caps on that side it's effective and over the years, I've learned to ameliorize my woodworking sins (BTW sin is derived from the Greek harmartia which means to "miss the mark".

Principle No. 15: Basic vise knowledge.
As far as placement of the front vise, I went against his dogma and for good reason. The pattern makers vise is really grippy and my front face has dogholes which allow for securing a long board effectively when going from left to right. For shorter boards my Moxon accessory vise allows me to start from either direction with no difference in how securely the piece is held. Also since my wagon vise is on the other side, it allows me to fasten from the movable dog, then start my planning from left to right.
I put in a fair amount of research prior to selecting the vises used on my bench. Minimizing wracking
was important as my prior vise suffered from a bad case of that. At times to counteract the marked tendency of the vise to separate distally from the area nearest the vise screws required the use of supplemental clamps. Holding long pieces vertically was particularly irritating as a board of similar thickness was required to counteract the pronounced racking the vise exhibited in that usage. On the other hand it was free. In researching front vises, the Emmert vise quickly became my focus, but the expense and rarity led to looking to the smaller (if a 50 lb vise qualifies as small) replicas. If it could indeed be able to hold stuff vertically, horizontally and at an angle securely, it was likely to have solved the racking problem. But looking at the install templates, the thickness of my old benchtop and having the top riddled with hardwood flooring nails was another incentive for a new top.
I also wanted a end vise. If you look at the top photo, there is a Veritas Wonder Dog which served that function with the old vise. The traditional end vises are more versatile than the Benchcrafted wagon vise was the most elegant,  robust and had the smallest footprint. The L-shaped end was concerning due to the bench being already 8 feet long. A vise adding to that length along with the tendency of the less expensive models to buckle up precluded that choice. Aside from the mass and weight of the bench itself, installation of both vises was the most time consuming, challenging, but in the end the most satisfying aspect of building the bench.
Principle No. 16: About those dog holes.
I went with one side using round holes and the other square ones. There are many accessories that make great use of 3/4" round holes. If not needed, they can be easily plugged up with dowels. Square pegs, on the other hand, seem to be a perfect match for a wagon vise. What was really important in choosing to use both was that they be parallel to each other. If your bench is too wide (see P.No 4), it's more difficult to use them together.

The other thing about dog holes is how many of them. It's the Goldilocks thing- not too little, not too much- just right. I decided to err in the too little direction as I did not want the top to look like swiss cheese. I'll likely put a few more holes, but not in the immediate future.
Principle No. 17: Storage on the Bench.
See P. No. 9. CS noted the space between the stretchers. Storage there makes sense and it's inobtrusive.

Principle No. 18: When finishing workbench, less is more.
Watco works for me.

And old workbenches should never die, mine lives on as a countertop.