Saturday, November 14, 2020

Little Free Library


After making a waiting area for G’s classroom library collection at home, the next step in finding these books a new home was to make a little free library. Our neighborhood- great evidence of why it’s a great neighborhood-does not lack for little free libraries-there is at least one more not shown on the map 

But our immediate area could use one and building one is something that has been on the back burner for awhile, so after looking at a few LFL’s  online and getting an idea of project size and placement from our local ones it was time to get back to the shop.

A neighbor once characterized me as overbuilding, which is OK as I’d rather be safe than sorry. This tendency was particularly evident this time;  I likely would have been just fine with lesser materials and finishes, but having a project on your front yard go wonky would be a drag.

The first decision was materials. I went with marine grade plywood given our very rainy climate as it was available locally and for a reasonable price, albeit 3x the cost of the regular sheet. Even then, it was recommended that it be treated with a good sealer product. This was my opportunity to work with an epoxy sealing product. I’m glad I bought the quart size. The instructions were to mix only an amount that you would be able to apply in 5-10 minutes. Being my first time, I mixed much more that that and had the mixed product spontaneously become hot, generate some very worrisome fumes and then solidify after about 15-20 minutes- pretty dramatic. 

No worries, however, as I promptly took the evolving mess outside and still had plenty product to seal both exterior and interior sides. 

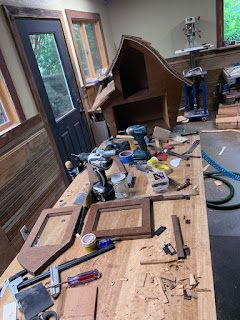
Woodworking being a hobby, I try to learn something new with each project. In addition to the above I wanted to design a structure that stayed away from right angles and straight lines where it didn’t interfere with function. 

The roof was an area that I wanted curvy in the slope and there were a number of ways to get that shape. I went with a combination of kerfing to allow the plywood to bend as needed, then used ⅛th inch flexible plywood (a find at CrossCut Lumber in Portland- a specialty product that’s worth stocking at home as it comes in handy) glued to the kerfed side and placed in molding forms to achieve the desired shape were used to make the roof.


The shingles were labor intensive as they needed shaping themselves to follow the contours of the roof- otherwise the curved roof shape looked more like a straight line. Thankfully, it only took me a couple of rows to see that. Removing the guilty shingles and shaping them was easy as it is a small area and cedar is nice stuff to work with that way.


The remainder of the build was straightforward. I was able to use the cutouts for the doors as the doors themselves- a first.

DW did the exterior painting- she’s good at that for which I’m most grateful as I don’t like painting. Thanks to the epoxy product the interior did not need further work.

Making and installing the post was not something I was looking forward to as it involved working with concrete. My first concession to age was buying 60lb sacs instead of the 80 lb. The other was mixing a little at a time in a five gallon container instead of all at one in a wheelbarrow or mixer which is what I’d done in the past. It took a little longer but worked out well.

But no battle plan survives first encounter with the enemy and when placing the LFL on its stand, DW felt it was too tall; unfortunately she was (rrrrr…) right.

After painstakingly putting it together and making sure it was square etc, having to modify it with a hand saw looked to be a drag of a chore, but- wasn’t too bad- a 30 minute bonus step.

Here is the finished LFL, official plaque and all. We’re very happy- it’s our idea of curb appeal and it was a fun project.


And we're on the map.

It’s gratifying to have G’s books find new homes and a bonus to see new books in the LFL. I’m hoping to have my clinic’s LFL built in time for the holidays- that one will be in the lobby and as such will save weather resistant measures.


Tuesday, November 3, 2020

A Major Book Migration


DW retired this year after 35 years of teaching mostly fourth and fifth graders. During that time she accumulated a sizable library in her classroom. Some inherited from her mom- also a teacher, some donated to her classroom from former students and their parents, but most purchased by her over the years. She originally intended to leave them to her successors who are good friends. The pandemic changed those plans. With her former team reassigned or laid off and with classroom learning on hold, we did not want the fate of these books left to the SK school district bureaucracy. Neither dropping them off at GoodWill or other donation sites do justice to the memories these books held and how important they were to DW. Thus her books came home with us rather than the collection face an uncertain future.

Redistributing these books to kids to continue promoting reading is our hope and wish as our lives have been richer in many ways because as kids we both had books in our homes. But how to store 2000 books while slowly having them find new homes w/o the house starting to look like a Hoarders episode?

The above is our spare room- of sorts. It was our guest room, but with the pandemic, not much need for that purpose- recently or for the foreseeable future. It also serves as a sewing room and had room for a bookcase. The challenge was to maximize shelf space while minimizing the footprint. Since most of the books needing a home were less than 7 inches wide, a floor to ceiling shallow bookcase was the solution. 

As no such bookcase was available and distant approximations were either made of MDF and of disposable quality or of solid wood and very expensive, the best option was DIY. One benefit of having owned Ikea bookcases is that while I hate particle board, their design and assembly approach is very functional and their cross dowel and connector bolt construction has worked well on other projects. 

The most practical way to make a 72” wide by 90” tall and 7.25” deep bookcase with 8 shelves is in effect as knockdown furniture- an Ikea Billy case but with solid hardwood sides and plywood/hardwood shelves.

I went against adjustable shelves in favor of fixed height shelves for rigidity as that allowed the use of festool loose tenons for knockdown assembly/disassembly.

This bookcase build was notable for a number of challenges that- thanks for the evolution of my shop over the past several years- could be accomplished with the resources at hand.

The number and variety of clamps needed to do the glue-ups proved the old woodworkers rule that one can never have too many clamps.


Bessey clamps can be joined together to make 100” long clamps- a  feature that’s come in handy in past projects and now in this one for the side panels.


Then cutting plywood and hardwood in 6 ft long lengths for the shelves, top and bottom panels in a manner that they were all the exact same length was made possible with my moveable workbenches.

Another challenge solved with mobile work benches and machines was the holes needed for the  cross dowels.


Here is a view of the side panels with the Ikea style cross dowel assembly used for the bottom and top shelves with the other shelves held with  Festool loose tenons. Thus the bookcase can be disassembled and more easily relocated if needed.


The bookcase was assembled in the room and presto- there’s storage for +/-1000 kid’s books. BUT,

not enough for all the books shown on the top photo plus probably another 1000 books in books in our basement.

So the leftover books were boxed and will be stored in the basement area. 

Here is the children's book section/guest bedroom/sewing room (the sewing machines against the wall not pictured)

The next step in the redistribution process is a Free Little Library for our home's front yard and another one for my clinic.


Sunday, November 1, 2020

The OED


MY first meaningful awareness of the Oxford English Dictionary was in the mid-2000’s when I started reading David Foster Wallace. He’s become one of my favorite authors, but damn if he wasn’t making me look up words constantly. Unsurprisingly, it turned out he was a dictionary fan in general and of the OED in particular.  When I first vaguely ideated acquiring it, DW promptly disavowed me of it- to the effect of where the hell are we going to put it? The below being our living room prior to 2012


So that notion lay dormant even after a 2012 home remodel to accommodate our growing book collection, 

Forward to the pandemic markedly limiting our activities while increasing our reading and finding another author- Annie Dillard whose vocabulary required frequent dictionary use. Yes, this is 2020 when it’s simple enough to google the word or use a dictionary app.  But in the meantime, in reading Simon Winchester’s The Professor and the Madman, the LA Public Library’s 2016 celebration of the OED along with other periodic references to it. the OED went from ideation to plan.

Making room for 20 volumes was as they say necessary but not sufficient. It also needed to be accessible and in a setting where it can be used- with a flat surface to rest an open volume and with good lighting to read comfortably. This is the new shelving and books.

The read comfortably part ruled out the compact version requiring a magnifier. 

DW wasn’t happy at first with making the existing display spaces for photos/artwork smaller, the below being the before photo

She eventually humored me, after negotiating for a future project. Ordering individual used volumes through eBay, Biblio and Abes instead of a new complete set was time consuming but worth the savings. The shelving was straight forward with the only challenging aspects involving the recessed light.

The only wrinkle was installing the recessed lighting- a simple task requiring a bit of router work. 


Hiding the wiring to the electrical outlets and for on/off operation without hiring an electrician and patching wall plaster took a bit more work but also was not too bad.

I had also, in the interval, purchased the concise OED edition in two volumes. It's a nice edition used but in very good condition and only missing the case which was not important to me.


The main advantage aside from being, well, concise, is it's a 2007 edition. It seemed more practical (I know- incongruous in this context) than getting the additions to the 1989 volumes (which are themselves dated as they were last published in 1997. In the reference material department, my remaining “want” is the OED Thesaurus which I have not been able to find used.