But it's an eye sore in several locations.

Some can be hidden from view with appropriate placement. Locating the sofa against the wall and flanked by side cabinets keeps Girlfriends work obscured while preventing Andy from cauing further damage. Andy, however, took to the arms with a vengeance and we have not been able to modify that behavior.

We were exploring re-upholstering the sofa, but couldn't decide on the covering in the likely case of not being able to find a closely matching material. Then there was the also likely case that Andy would eviscerate the poor sofa again.
An alternative approach developed while researching miter jacks (see previous post).
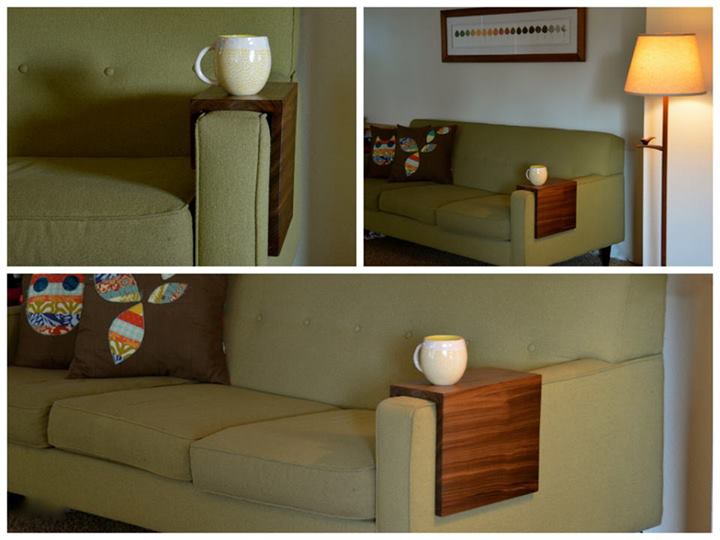
Our couch's arms with it's curves and angles, along with the location of the area needing shielding presented a number of challenges in adapting that idea to our problem.
Which brings back a previously used quote
Make sure that your next project is beyond your skill and requires tools you don't have. You won't regret it.
I had used kerfing but with drywall and a long time ago. I wasted 2 sq feet of walnut and an afternoon of time before admitting the need for instruction- the problem was that the kerfs needed to be perpendicular to the grain for optimal flexibility. In retrospect, this would seem be obvious, but being a master of the obvious sometimes eludes me. Kerfing with hardwoods and at a fairly tight radius left me fairly humbled (not anything new) and required the band at the upper aspect of the curved panel to hide the gaps between the top and the side panel as well as the areas where the thin obvious patching on my first attempt at curved panels.

The thin band used for this required thin kerfs , something that the BCTW Jointmaker greatly facilitated.


A valuable aspect of hobby activities is that it allows risk taking and to indulge my bent for impatience and "winging it". While the result is serviceable, to my liking and has DW's approval, there's much room for improvement. The next attempt at this sort of thing will be closer to 1/8th rather than 1/16th along with using a hot soaked towel to help with molding. I've also read that using a mold pattern to allow for the panel to dry in the desired shape also helps a lot.
In the tools I don't have dept, a spokeshave (along with investing time to learn to use) and a good quality coping saw will be necessary investments if I'm going to significantly improve with curved pieces. A spokeshave would have come in handy when trimming the curved portion of the top to match the curved panel. That was the one place where I could not use the loose tenons to guide placement.

Here's the couch armor in place from the side

And the front view

1 comment:
That’s a very creative solution! How has your cat responded to it?
Post a Comment