Saturday, June 26, 2021

Bookbinding resumed

One would have thought that the pandemic would be a great time to make more books and develop skills. Foe a while it was. In the Summer, I made one for DW as a retirement gift, hoping to partly make up for not being around her colleagues/friends and students and for having only a small group of her friends for a outdoors retirement party. It was my sophomore effort with quarter binding using leather and hardwood veneers. There's always room for improvement, but I was greatly honored by DW's appreciation of it. 


After that effort, I upgraded to the Epson P900 as being able to swap between matte and glossy inks without the ink waste penalty was an upgrade most Epson users had long been waiting for. Few things in the digital darkroom are as infuriating as realizing you were getting screwed when the printer informed- wait while ink is being changed (and getting flushed to the waste tank).  However, Imageprint after the reps noting its imminent availability starting 3rd Q 2020 was not available for the P900 until this spring.  I wasn't printing any new books until the software was available as I found the layout and color correction options essential in the making of the sheets into book signatures. 
Thus more than a year transpired between book projects. In the interval I had started looking in on a couple of Facebook bookbinding groups after finding the Reddit bookbings sub initially helpful but not very interactive and more focused on styles I'm not interested in. I continued to look for on-line groups and literature with a focus on hand made photobooks. 
At this point, I'm still a bookbinding newbie with less than a year of experience and with more books on the topic than books made. 


Keeping in mind fellow newbies in the Facebook group and in the Leica Forum photobook topic, here are the jigs I've made for bookbinding

I picked our Ireland trip I did not print many of the photos taken at that time and many could be improved on using 2020 printer/software technology as opposed to 2005. Another reason for waiting for the Imageprint RIP was that it would make printing a large number of small prints on panorama sized paper much faster and easier. 

The next part was trying to remember the sequence/location of where the photos were taken, as Ger and I were often doing activities in separate groups as it was a bicycling tour. 
Also, I was using a film camera and label my slides and negatives minimally and my metadata was year and country. DW was using a Nikon D70, however. So the metadata from those files filled in our hazy 15 year old recollections. 
The next step was to organize 110 3x5's into a book dummy.
Oddly enough, the book dummy with its less than elegant name and, in the form I've made them, belie its importance in the bookmaking process.  In this case took more time to put together than the book case. 
The next step is printing the pages of the book. At this point I'm relying on Imageprint for the proofing and layout.  This is what  looks like.
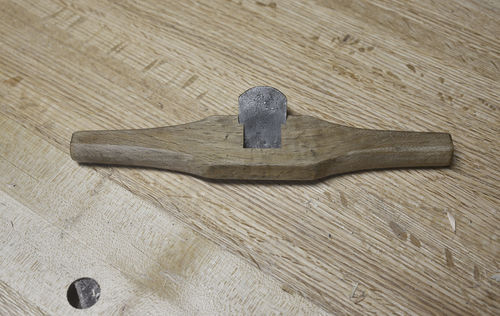
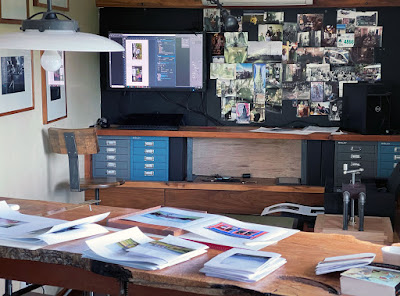
Another book making jig specific for my purposes is this scoring guide. Photo paper being thick and coated on both sides is difficult to score. This guide allows the bone folder to score the paper sufficiently deep to be able to cleanly and accurately fold it. 
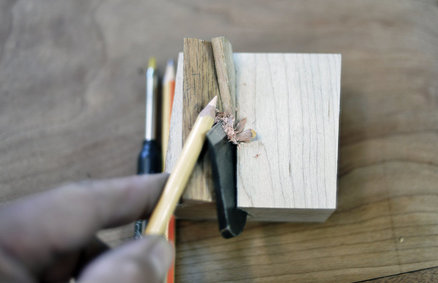
I use the sewing frame and cradle pictured above to make the book block much like everyone else so I did not take photos of the process. The lying press is used to apply the glue to the spine and for rounding the spine if I'm doing that step. I'm not devoting any space to that aspect as it's straight forward and this post is long enough as it is. One aspect of making the book block that seems to be a challenge for newbies is trimming the text block to produce a smooth, even edge on the head, tail and foreedge of the block. No guillotine or plough, no problem if you're a woodworker. A Moxon vise and a quality carpenters square together with a plywood square with a support base to hold the case square provide the support and alignment for an accurate cut. A paring chisel's long blade together with thick front jaw make it easy to produce a smooth and square cut.
I won't go into details on constructing the block cover. A lesson learned from past efforts is the importance of the endpapers. I used papers not specifically made for that purpose with suboptimal results. This time I ordered papers made for that purpose with improved results. I'm still having difficulty reliably printing the spine title so that it's square with the leather covering and came close to an expensive mistake. If I'm going to any front and back lettering, I'll likely have to learn Bradel binding. For now, I've made another book and some more of our photos are out of the hard drives.
InDesign is another thing I'll have to learn but that's not going to happen any time soon, In parting, here's a reference as to what can be involved. Bear in mind, it does not cover printing or making the book itself. And for that price it's online!


Saturday, January 9, 2021

Pencil and Pen Box

This belongs to the- feel like doing something in the shop but don't want to start a major project- category. Thanks to the mechanical pencil misadventure which was the subject of the prior post, I now had a fun DIY pencil sharpener and a bunch of sharpened pencils that needed a container. Yeah, I could use a coffee can or glass, but what's the fun in that. Also, thanks to the pandemic (reading more), I've taken a renewed interest in fountain pens- they work better for me with marginalia and underlining. I also wanted a lid so the pencils could be transported from house to shop w/o breaking the points.

I started with plywood remnants and other materials I had in the shop. The box was originally intended as mockup to get an idea of box and compartments. Thus the use of 21G brads visible on the sides and cover.

 Also, why the bottom is less than elegantly finished. 


About  a third of the way through the project, it became apparent that trying to make a box without any visible brad heads was overkill for the purpose of a fun several hour project. Also, it's not going to be for storing any "luxury writing instruments" - my experience with Modern Fuel's product cured me of that. BTW, I returned their defective product more than two weeks ago and have not received a credit. 

The Moxon vise on my work desk makes a good parking place when I'm not using the vise for bookbinding.

That said, this little box was fun to make, does its function well and is satisfying to use and look at. Bonus is having a home for our tablet styluses.


Sunday, December 20, 2020

The Improved and Safer Pencil Sharpener

This is a revision of a little instrument I made a few years ago from a bonus spokeshave that had been

included in a Japan eBay purchase


The blade was made into a pencil/lead sharpener.

It worked and remained in this configuration until I brushed up against the business tip of the blade

several weeks ago while cleaning up my benchtop. Only a superficial cut requiring a small band-aid but,

nonetheless a warning. When I had first shown it to DW, she thought it was cute, but did not want it in

the house, calling it an injury waiting to happen.

So the shop cleanup stopped and v.2 of the pencil sharpener began after first aid completed.

The first step after removing the protruding part below the blade  was a taper where the blade seats into

the block- easily done with a thin wood slice from a remnant piece of hardwood.

Matching the woods was not a priority. In the groove hopefully can be seen the cherry wood piece.

The next step was to make a cap that would cover to top of the blade waiting to slice, perhaps impale someone. This required a tapered groove to fit the shape of the blade. A western style plane blade would have made this fitting simpler, but 1) that’s the blade the design was built around and 2) I prefer Japanese blades. With the help of my miter jack jig the cap was made of three pieces glued together and then shaped to cover the tip while allowing the rest of the blade to do its work. 

Another photo with the blade cover on and a little dish for the shavings.

There are much simpler sharpening devices and much more automated ones. But a very useful aspect of the design is that it allows for differing angles as well as different points- standard, blunt vs sharp as well as chisel. It can serve for sharpening lead points as well (lead pointer).


Then there is the mechanical pencil option. I've been a geek about that instrument since I was able to write and have a bunch of them in varying lead thicknesses and quality; many passed on from my mom and DW. Right now, as I'm typing this, mechanical pencils are on my shit list. The black cloud over mechanical pencils is due to after having splurged on a putative marvel of design and craftsmanship, it arrives DOA- point won't advance and the retractable lead guard tip will not lock in place. After all that bally-hoo, the thing does not write. I'm not outing the brand as I've sent a complaint today and am waiting on how this is addressed.


It looks nice, though. What I got out of making and using my pencil sharpener versus buying this (at this time) lead holder led to a consideration of value which is a longstanding interest. One of the books I read this year, Having and Being Had, touched on many aspects of living in a capitalist society but did not dwell on them deeply. While I gave it a middling grade for that, the book was very much worthwhile as a thought/reflection activator on value. The pencil sharpener is valuable to me (an important qualifier) because of the IKEA effect (the increase in valuation of self-made products), scarcity (who else has one?), versatility (see above) and aesthetics (Wabi-Sabi). At the same time it has limited commercial prospects as the few who might be attracted to it, most can either make their version and those who can't would likely balk at the price at the Etsy level of production. If mass produced, then it turns into just another trinket likely to be discarded (see Veritas pencil sharpener).

Back to pencil sharpening. I suppose I ought to have better things to do with my time than doing things this way. But I like doing crafty stuff and this is the IKEA effect applied to the pencil sharpening act itself. But then, just as with anything done by humans, there's any number of folks who will make you look reasonable and moderate. This guy provides a frame of reference as to what can happen: $38.00 in paperback.


"...I am so thrilled David Rees is picking up the reins of the forgotten art of manual graphite-encased-in-wood point-crafting. I love my pencil!"
—AMY SEDARIS

Sewing Machine Makeover

 As covered in an earlier post, it was important that my Mom’s sewing machines stay in the family. One reason is sentimental, the other is that DW was a prolific sewing enthusiast in her younger days. Work and other adult stuff led to that activity hibernating, but with her planning to take that up again when she had more time. So the machines sat in our spare room for a couple of years.


With the pandemic and retirement, her interest in sewing  resurfaced. Also, while the spare room saw no use this year due to lack of out of town visitors, now it was being used more often after becoming the holding library for DW’s children’s book collection. With that, there was less room for the machines. The only wall left was the one from where the photo was taken.


The easiest solution would be to saw off the overhang where the side drawer mounts. Would provide another foot which would allow for the machines to be side by side and for the closet door to open fully.

Machine to be where cat and daybed are
Machines to be where cat and daybed are
While that would be easy to do with a track saw in situ, it would generate a lot of dust and an ugly end result. That meant dismounting the machines then removing the tops. The part I was least looking forward to was the first.

Underside of the Fomax

The main challenge of the Fomax disassembly was the position and weight of the motor. The overlock machine in one aspect was easier as the machine and motor were not attached to the top but to a supporting platform that hung from the top with bolts. Below shows the scaffolding for that platform was done to allow for removal of the top. It also shows quite a bit of sagging- one of the many reasons I despise particle board.

The machines are built like tanks given that they were meant for professional use. The tabletops though, were made of particle board and formica veneer and left much to be desired. Again, easy solution to the placement problem is to chop off the side where the drawer goes in the shop, remove the edge veneer on the othe sides, replace with new edging and reinstall- but that would not solve having to live with particle board and formica. So between DW’s renewed interest in sewing and my non-work activity options limited thanks to the pandemic, it was a good time for making new tops.

The cutouts for the machines were straight forward given that I was making the replacements from planks as opposed to plywood panels.

The old tops served as templates for drilling mounting holes for the machine and for the tops.


One source of concern had been the difference in table thickness as the hardwood was 1/4th inch thicker than the original top which might have made a difference in the motor belt tension. Thankfully the motor provided a mechanism to compensate for that. Another little wrinkle that was easier to solve with the machines partially disassembled was providing leather pads for the metal feet. The last problem was addressing both the sag and the appearance of the overlock machine platform- Replacing it with a plywood one would have been more work than it was worth. The rabetted hardwood piece in front both hides the end "grain" and with glue and screws corrected the sag.

Here are the machines with the new tops. The change from 48 to 41 inches long for the tops allows them to be along a shorter wall. 

The room looks much more lived in now. Have to think Mom would be pleased with the new tops.


Saturday, November 14, 2020

Little Free Library


After making a waiting area for G’s classroom library collection at home, the next step in finding these books a new home was to make a little free library. Our neighborhood- great evidence of why it’s a great neighborhood-does not lack for little free libraries-there is at least one more not shown on the map 

But our immediate area could use one and building one is something that has been on the back burner for awhile, so after looking at a few LFL’s  online and getting an idea of project size and placement from our local ones it was time to get back to the shop.

A neighbor once characterized me as overbuilding, which is OK as I’d rather be safe than sorry. This tendency was particularly evident this time;  I likely would have been just fine with lesser materials and finishes, but having a project on your front yard go wonky would be a drag.

The first decision was materials. I went with marine grade plywood given our very rainy climate as it was available locally and for a reasonable price, albeit 3x the cost of the regular sheet. Even then, it was recommended that it be treated with a good sealer product. This was my opportunity to work with an epoxy sealing product. I’m glad I bought the quart size. The instructions were to mix only an amount that you would be able to apply in 5-10 minutes. Being my first time, I mixed much more that that and had the mixed product spontaneously become hot, generate some very worrisome fumes and then solidify after about 15-20 minutes- pretty dramatic. 

No worries, however, as I promptly took the evolving mess outside and still had plenty product to seal both exterior and interior sides. 

Woodworking being a hobby, I try to learn something new with each project. In addition to the above I wanted to design a structure that stayed away from right angles and straight lines where it didn’t interfere with function. 

The roof was an area that I wanted curvy in the slope and there were a number of ways to get that shape. I went with a combination of kerfing to allow the plywood to bend as needed, then used ⅛th inch flexible plywood (a find at CrossCut Lumber in Portland- a specialty product that’s worth stocking at home as it comes in handy) glued to the kerfed side and placed in molding forms to achieve the desired shape were used to make the roof.


The shingles were labor intensive as they needed shaping themselves to follow the contours of the roof- otherwise the curved roof shape looked more like a straight line. Thankfully, it only took me a couple of rows to see that. Removing the guilty shingles and shaping them was easy as it is a small area and cedar is nice stuff to work with that way.


The remainder of the build was straightforward. I was able to use the cutouts for the doors as the doors themselves- a first.

DW did the exterior painting- she’s good at that for which I’m most grateful as I don’t like painting. Thanks to the epoxy product the interior did not need further work.

Making and installing the post was not something I was looking forward to as it involved working with concrete. My first concession to age was buying 60lb sacs instead of the 80 lb. The other was mixing a little at a time in a five gallon container instead of all at one in a wheelbarrow or mixer which is what I’d done in the past. It took a little longer but worked out well.

But no battle plan survives first encounter with the enemy and when placing the LFL on its stand, DW felt it was too tall; unfortunately she was (rrrrr…) right.

After painstakingly putting it together and making sure it was square etc, having to modify it with a hand saw looked to be a drag of a chore, but- wasn’t too bad- a 30 minute bonus step.

Here is the finished LFL, official plaque and all. We’re very happy- it’s our idea of curb appeal and it was a fun project.


And we're on the map.

It’s gratifying to have G’s books find new homes and a bonus to see new books in the LFL. I’m hoping to have my clinic’s LFL built in time for the holidays- that one will be in the lobby and as such will save weather resistant measures.


Tuesday, November 3, 2020

A Major Book Migration


DW retired this year after 35 years of teaching mostly fourth and fifth graders. During that time she accumulated a sizable library in her classroom. Some inherited from her mom- also a teacher, some donated to her classroom from former students and their parents, but most purchased by her over the years. She originally intended to leave them to her successors who are good friends. The pandemic changed those plans. With her former team reassigned or laid off and with classroom learning on hold, we did not want the fate of these books left to the SK school district bureaucracy. Neither dropping them off at GoodWill or other donation sites do justice to the memories these books held and how important they were to DW. Thus her books came home with us rather than the collection face an uncertain future.

Redistributing these books to kids to continue promoting reading is our hope and wish as our lives have been richer in many ways because as kids we both had books in our homes. But how to store 2000 books while slowly having them find new homes w/o the house starting to look like a Hoarders episode?

The above is our spare room- of sorts. It was our guest room, but with the pandemic, not much need for that purpose- recently or for the foreseeable future. It also serves as a sewing room and had room for a bookcase. The challenge was to maximize shelf space while minimizing the footprint. Since most of the books needing a home were less than 7 inches wide, a floor to ceiling shallow bookcase was the solution. 

As no such bookcase was available and distant approximations were either made of MDF and of disposable quality or of solid wood and very expensive, the best option was DIY. One benefit of having owned Ikea bookcases is that while I hate particle board, their design and assembly approach is very functional and their cross dowel and connector bolt construction has worked well on other projects. 

The most practical way to make a 72” wide by 90” tall and 7.25” deep bookcase with 8 shelves is in effect as knockdown furniture- an Ikea Billy case but with solid hardwood sides and plywood/hardwood shelves.

I went against adjustable shelves in favor of fixed height shelves for rigidity as that allowed the use of festool loose tenons for knockdown assembly/disassembly.

This bookcase build was notable for a number of challenges that- thanks for the evolution of my shop over the past several years- could be accomplished with the resources at hand.

The number and variety of clamps needed to do the glue-ups proved the old woodworkers rule that one can never have too many clamps.


Bessey clamps can be joined together to make 100” long clamps- a  feature that’s come in handy in past projects and now in this one for the side panels.


Then cutting plywood and hardwood in 6 ft long lengths for the shelves, top and bottom panels in a manner that they were all the exact same length was made possible with my moveable workbenches.

Another challenge solved with mobile work benches and machines was the holes needed for the  cross dowels.


Here is a view of the side panels with the Ikea style cross dowel assembly used for the bottom and top shelves with the other shelves held with  Festool loose tenons. Thus the bookcase can be disassembled and more easily relocated if needed.


The bookcase was assembled in the room and presto- there’s storage for +/-1000 kid’s books. BUT,

not enough for all the books shown on the top photo plus probably another 1000 books in books in our basement.

So the leftover books were boxed and will be stored in the basement area. 

Here is the children's book section/guest bedroom/sewing room (the sewing machines against the wall not pictured)

The next step in the redistribution process is a Free Little Library for our home's front yard and another one for my clinic.